A comprehensive WordPress deployment on AWS (single-site)
Introduction
Having already set up a few WordPress (WP) instances, I though it’s a good time to note down some of the things I’ve learnt over time. Especially focusing on taking a simple deployment and making it more robust both in terms of performance and security. This content goes well above the basic, so if you are looking for a beginners guide then this article is probably not for you. Keep in mind that there are so many solutions out there which make it hard to judge which is the ‘best’. I like to think that the ‘best’ solution is the one you understand, can clearly explain to others and ultimately works for you.
Just for the record, I’m not a die-hard WP fan. WP has its place in the world of website hosting and just like any tool it comes with its pros and cons. Here is my attempt at addressing some of bigger cons. And no, you don’t need any PHP know-how.
Getting started
Getting a simple instance working with WP and Route53 is fairly straight forward, at the same time this is when the first problem creeps in. You are now responsible for a server which has to be open to the wide world. In a very short space of time, what appears as a simple WP roll-out becomes not so simple after all. Time and time again I’ve monitored instances getting hammered by bots (script-kiddies) which usually don’t achieve much more than soaking up resources, which you are paying for. Most anti-WP scripts are fairly silly so you can protect yourself from them by taking simple steps e.g don’t use your name/host-name as the admin user, use a generated password, etc.
You really don’t want to have anything to do with unencrypted traffic these days. Luckily, setting up SSL/TLS on your WP is easy and there are a ton of tutorials out there describing how to do it. Obtaining a certificate is where things get complicated and this is where I begin this guide, walk-through, call-it-what-ever-you-want. Let’s start of with a visual representation of what my solution looks like:
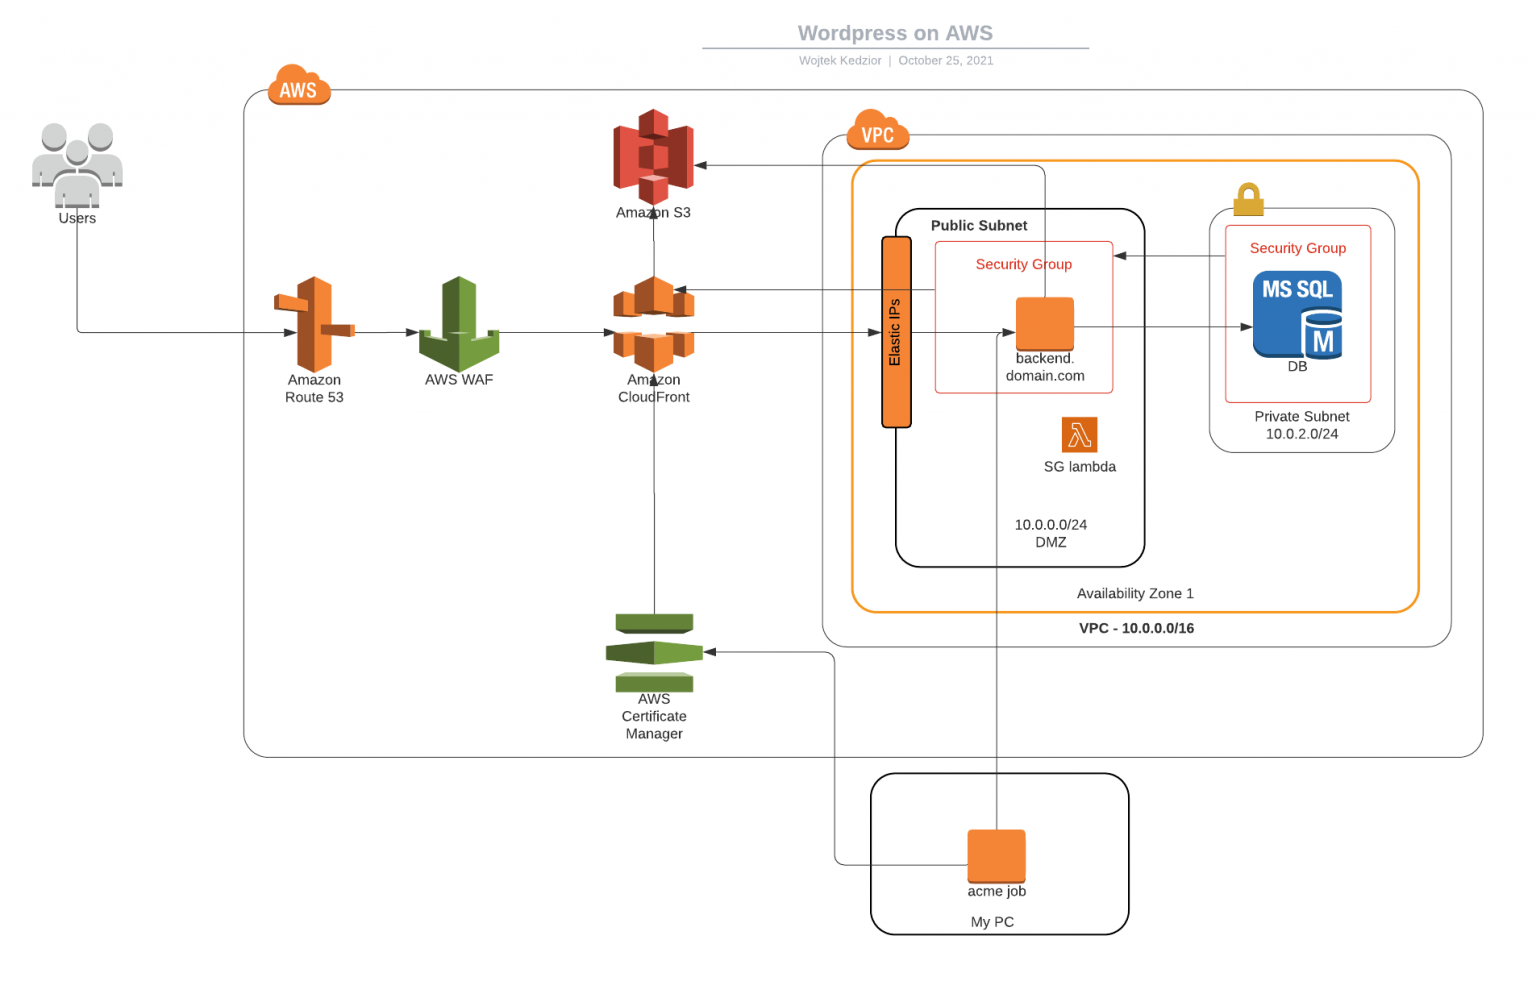
Usability Requirements:
- host a website which is mostly made up of static content
- some partially static content (this is content which is updated once a week)
- site is viewed from all over the world with most views coming from Europe, North America and South East Asia
- there are no editors (meaning people other than me needing access to the admin areas)
- the page must be on a .CZ domain (AWS does not offer .CZ domains yet)
- the main page is www.erawanprague.cz and erawanprague.cz must also point to it.
Technical Requirements:
- hosted in AWS
- site must use SSL/TLS
- the WP server should not be accessible directly
- content must be cached where appropriate
- semi-static content to be updated automatically (more on that later)
- automated TLS certificate renewal
- as cheap as possible while as secure as possible
Route53 config
- example.com – A-record alias to the CF distribution
- www.example.com – A-record alias to the CF distribution
- backend.example.com – A-record alias to the IP of the EC2 instance (hopefully an Elastic IP)
Origins
We can now define an origin which is accessible at backend.example.com. Later on we will add one more origin which will point to an S3 bucket, but for now we will need to specify the Behaviors for our content and this is where things can really break. I recommend to take a look at this guide. Essentially, what we would like to achieve here is to cache as much of the content our users are likely to see, but don’t cache the more dynamic admin pages. Caching can break some or all of the admin functionality. Therefore the Behavior for /wp-admin is more relaxed as it forwards all the cookies and query strings to the origin. There is one BIG gotcha and that is that CloudFront does not pass the User-Agent header, which is important for the content editors. Even when using the default block editor you will have problems if the User-Agent header is missing. Adding the User-Agent header reduces the cache hit-rate as there are many many possible values which it can contain, but if you don’t have many admins then that’s not really a problem. There are other ways to solve this too, for example by using a Lambda Function to add the User-Agent header before forwarding the request to the origin.
Let's Encrypt
What is Let’s Encrypt? When creating the Distribution you can choose to specify a SSL certificate. You can go with the default *.cloudfront.net certificate which is trusted by modern browsers. This may be OK for some people, but in my opinion it does not look professional. This certificate is for the connection between the browser and CloudFront. For the connection between CloudFront and your origin you need to stick the certificate on your server but you cannot reuse the default certificate. Instead, you could use a cheap one-domain certificate on your server but you’ll ‘lose’ one domain for the server host-name. This is exactly where the wildcard certificate comes in. Since you are working with one certificate you can uploaded it to AWS Certificate Manager (ACM) and thus expose it to CloudFront. While at the same time the same certificate can be applied to the httpd service on your instance to encrypted traffic between the origin and the CDN. Now you are using the same certificate in both places. The only thing that is left is to automate the renewal of the certificate and its distribution. Note that you cannot use a certificate from ACM in your instance. Certificates stored in ACM can only be used with AWS services such as ElasticLoadBalancers or CloudFront. See the section on wildcard certificates with Let’s Encrypt below for an possible solution.
WAF Shield
Let’s move right to the front of the whole setup and take a minute to think about what is exposed to the outside world. At the moment that would be everything assuming you have the allow-all security group policy for HTTP and HTTPS. I will talk about Security Groups in the next section, but for now let’s take a look at the AWS WAF shield. This service lets you block traffic based on content and source, which is perfect as what I want to allow traffic to wp-login and wp-admin only from an IP address of my choosing. Otherwise the request is dropped. Although this service comes with a cost, that cost is nothing considering that you can use the same rule for multiple distributions. Unless you’ve renamed all the wp-admin pages on some of your distributions or don’t host WordPress, the rule will apply to all of them. This rule effectively gets rid of all hack attempts at gaining access to the admin area. But there is a glitch here. The WAF shield is sat on top of CloudFront, but our instance has a public domain (backend.erawanprague.cz), so to get at the wp-admin of the site I could just hammer the back-end URL as the traffic to it does not get routed through the CDN and thus the WAF Shield. To solve this we can work some magic with Security Groups.
Security Groups
Using AWS Security Groups (and their Quotas) we can control inbound traffic to our instance by only allowing traffic from CloudFront Edge servers. There are lots of Edge servers and their IPs may change over time especially as new ones come up. Imagine then a situation where visitors from Europe going via a European Edge server get to see your content but visitors going through an American Edge don’t because you’ve forgotten to add/update the American Edge server’s IP. Doing this manually is not an option, but there is a neat solution via Lambda. Since AWS expose the Edge server IPs. I wrote a simple script which triggers when AWS update their IPs. This happens by subscribing to an SNS topic here. You can then trigger a LambdaFunction (https://github.com/wojtekkedzior/sg-updater) which will update your security groups, which should be attached to your instance.
Note: Here you will most likely run into AWS limits (aka Quotas) as by default, an SG can only contain a maximum of 120 (60 inbound and 60 outbound) rules. This limit come into affect when trying to create a SG for the global edge locations as there are more than 60. I observed 67 at the time when I ran into this quota. To address the limit you can ask AWS to increase the rule capacity. According to the documentation, AWS will calculate the limits in such a way that you will not be able to add more than 1000 rules per instance. For example if you ask for 20 security groups to be allowed per instance, then they will adjust the rule limits like so – 1000/20/2. This will result in having a total limit of rules per SG set to 50. I asked for 10 security groups per instance, but interestingly enough i still have 60 rules (120 total) per instance. Alternatively you can get creative with the lambda by creating multiple groups and distributing the rules between them. I opted to go with both approaches. Firstly by increasing the SG limit per instance and then hacking the lambda to handle more SGs.
The WP server is now fairly locked down as it’s not accessible from the outside world. There is an extra group granting me SSH access with a valid key and only from a specific IP.
S3 Origin
Earlier I spoke about having multiple Origins where one is the instance with WordPress and the second being an S3 bucket. Some people use S3 to host their media content, which is not a bad idea. Here I’m going to talk about a specific scenario. The website has a weekly menu, which is emailed to an email address. A script running as a cronjob (although the cron could run on the server hosting WP, I’ve decided to run it from somewhere else), polling the inbox, retrieving the latest email and uploading the attachment to the S3 if one is found. A word of caution on security here: Although I won;t disclose the name of the email address, this solution can be taken advantage off, therefore the script in Github is only the mechanism which gets the data, but there is a separate script which does some magic with the PDF to ensure it’s from a trusted source. I won’t be publishing the magical script.
The last step after updating the PDF, is to invalidate the resource in CloudFront so that viewers start seeing the latest version of the menu.
CORS
What is CORS? Now that we are receiving the lunch menu on a weekly basis all we really have to do is specify a new origin and define a Behavior for the menu.pdf file. The site uses a PDF plugin that forces the browser to fetch the PDF from S3. Does this mean that the location of the menu file publicly accessible? Well, it has to be, but we can restrict access to it by using CORS. With CORS we can tell S3 to only serve content if the request comes from the viewer and is preceded by an HTTP Options request. Of course, you can get around that by writing a bit of code to do the Pre-Fetch followed by the GET, but you’d simply end up with a PDF that is publicly available anyway. One of the benefits of CORS is that it helps to keep the hosting of our menu limited to only our domain. This behaviour is enforced by web browsers.
(https://erawan-menu.s3-eu-west-1.amazonaws.com/menu.pdf) won’t work, but https://www.erawanprague.cz/menu.pdf will.
A wildcard certificate from Let's Encrypt
I’ve already mentioned certificates, but here is a bit more detail as to how I’ve chosen to work with Let’s Encrypt and why. I’ve written a little tool which automates the request to Let’s Encrypt, sorts out the DNS Challenge and puts the obtained certificates in the right place. Best practice for certbot promotes installing it on the server so that the private certificate never leaves the box and you can use the ‘renew’ command after you have obtained the certificate. The point is that you can execute the renew on a regular basis and it will decide when to renew the certificate based on the expiry date. I’ve chosen the run certbot outside of my servers and don’t rely on the renew command. Instead I always attempt to obtain a new certificate. If a certificate is obtained successfully, the script updates the certificate in ACM (and you don’t even have to reconfigure the distribution). The last step is to send the certs over to the EC2 via SSH and restart httpd. Since I do this more often than once every three months, I’m not too worried about the certificates get compromised as they change frequently.
Another good reason to not run certbot from my servers directly is that I need to update the certificate in ACM, meaning the roles for my instances (or rather my instance profile) would have to have access to ACM. I think the role of the instances should allow as little access as possible and in my case, that is absolutely nothing.
Cost
Clearly cost is an important factor. I’ve decided to list is towards the end because it’s not static and your millage will vary. I have an RDS DB that I’m using for other purposes so the DB cost is very small for me. I chose to do a 12-month, no-upfront reservation on an instance to run this site on. You can squeeze more WP sites on one instance if you are careful and know how to tweak your resources. It helps to know roughly how much traffic you are going to get.
WAF sets me back about 8 bucks per month. This is one area I won’t skimp out on. I want my instance to only deal with real traffic and have the WAF block most requests which try to hack/break the site. It’s money well spent. Cloudfront and S3 costs are next to nothing. In fact the last bill came to $0.20 for both services. The Security group, lambda, events are all virtually free. That leaves the domain, which is a standard annual cost. Finally the traffic, which really depends on your media and number of visitors.
Running WordPress for as little cost as possible
In case you want to run your WordPress site for as little cost as possible, you can explore the idea of exporting your site and hosting the Html from something like S3. You’ll still need to buy a domain, use Cloudfront (for HTTPS as S3 hosting does not support it) and factor in the cost of storing your files in S3. Unless you are getting lots of traffic and your site has lots of images/media then you should be able to run such a setup for around $2 per month all up.
Verification
Now that everything is running we need to do validate the SSL certificate at something like SSL Labs which will help with identifying any loose ends on your web-server such as allowing SSL3 or deprecated cipher suites. The aim is obviously to get a rating A, but an A will suffice. Just keep in mind that you have a CDN fronting your server, so you may want to run a few of these tests against your naked server (just point your Route 53 records to the IP address of your instance)
For performance use Google’s PageSpeed Insights
Kali Linux is yet another tool you can use to test your own setup. Although once you set up everything outlined above, basic hack attack vs your site from a Kali Linux image won’t do any damage at all. Remember, we are blocking all traffic to wp-login and wp-admin even before it his the CDN. And your server is sat behind an AWS security group therefore it’s not publicly available. That leaves two options: 1) an advanced TCP/IP attack or 2)a DOS. The value of the CDN comes into play here as it will be able to deal with some DOS/DDOS attacks, yet there are some unnatural things you can do on the lower level protocol to cause this setup some trouble.
Conclusion
If you like tinkering and are keen on doing some system-admin work, then going through the setup above will teach you a mountain of stuff. On the other hand, if you don’t have any IT-know how and just need a site, then there are better options for you, and in all honest you’ll likely struggle trying to replicate what was discussed. Assuming you are willing to dive in, you will be in a position of a lot of control, which is a good thing but it also means you can really break stuff and maintenance isn’t as simple as you might like.
I’m glad I’ve suffered through setting up all of this because I’ve gained a mountain of knowledge!